Vaisala WXT520 Met-Pack
Vaisala WXT520 cable with DB9 serial connector
9V battery
Ashtech MicroZ
Ashtech MicroZ Y cable
Hyperterminal (Private Edition, Ver. 6.3 by Hilgraeve Monroe, Michigan USA was used for this test)
Vaisala Configuration Tool Version 2.01 r. 9 (see link below)
We first describe how to configure the WXT520 to output a single XDR NMEA v3.0 0183 message containing the following values: Pressure, Temperature, Humidity, Wind Speed, Wind Direction, Rain Accumulation & Hail Accumulation. The reason we choose an XDR NMEA v3.0 0183 message is because this is the only type of met message the Ashtech MircoZ can receive.
One way to configure the WXT520 is using the Vaisala Configuration Tool. The latest version at the time of writing this is Ver. 2.01 r.9; it can be downloaded at http://www.vaisala.com/services/software.html.
Connect the WXT520 to a Windows computer and start up the Configuration Tool. If you don’t see any readings coming in, you will have to go into Configuration Setup via File → Configuration Setup. The following window will appear:
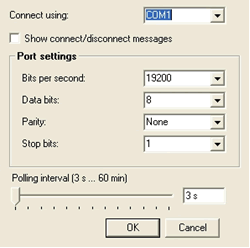
Figure 1: COM port settings for communicating with a WXT520 using the Vaisala Configuration Tool.
Confirm the settings above and click OK. In the main window you should now see some values being read by the Configuration Tool from WXT520.
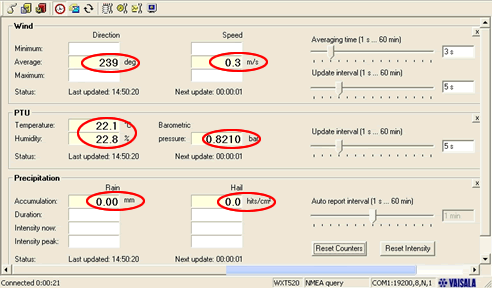
Figure 2: Main window of the Vaisala Configuration Tool. The circled values are read automatically from the WXT520 if it is set up to output Wind, PTU and Precipitation.
Now that the Vaisala Configuration Tool is communicating with the WXT520 we can start setting it up to output the XDR NMEA v3.0 0189 message.
From the Settings drop-down menu select “Device…” The following window will appear; check that the settings are as they are shown here:
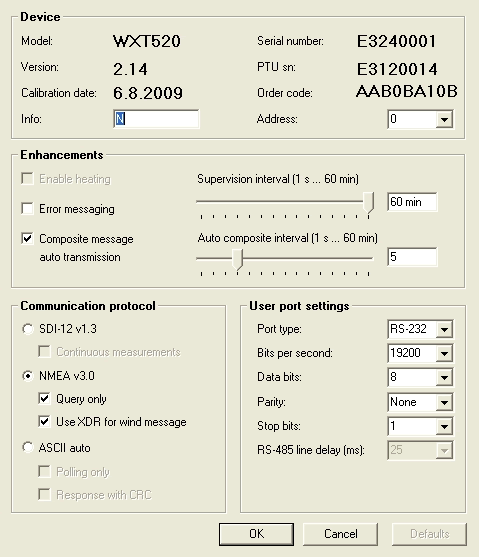
Figure 3: The Device Configuration window for the WXT520. The key settings in this window are the “Composite Message auto transmission” checkbox and the “Auto Composite interval”. Set the interval to what you need it to be. The next key setting in this window is the “Communication protocol”. Be sure to select “NMEA v3.0” and check the “Query Only” and the “Use XDR for wind message”.
Note that we have checked the “Query Only” box in the Communication Protocol section. This is so that Wind, PTU and Precipitation data don’t come through unless the WXT520 is queried for them. Also note that we check “Composite message auto transmission” so the composite message will automatically be output but the individual Wind, PTU and Precipitation will not. This is crucial. After you are done click OK.
We now configure the Wind, PTU and Precipitation sensors within the WXT520. From the Settings drop-down menu select “Sensors…” You will get the following window. Check that the settings are as they are shown here:
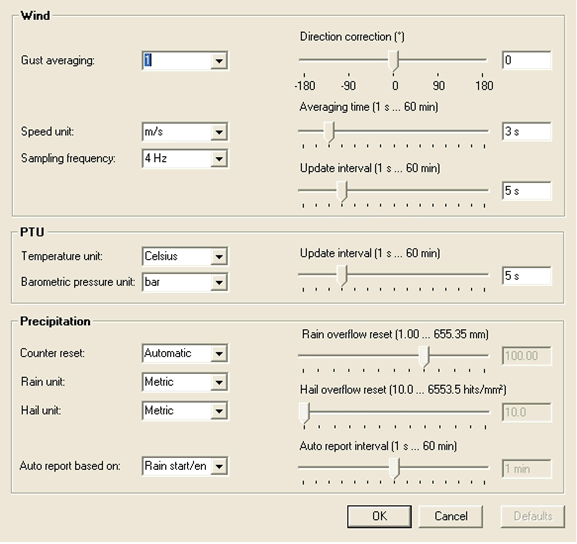
Figure 4: WXT520 sensor settings. The main things to change here are the PTU “Temperature Unit” and the “Barometric pressure unit”.
Now we move on to the final step in configuring this WXT520, the Message Settings. From the Settings drop-down menu select “Messages…” The following window will appear. Check that the settings are as they are shown here:

Figure 5: The Wind, PTU and Precipitation message boxes are the values that are queried by the Vaisala Configuration Tool as in Figure 2. The values under the Composite Message Section are the values that will be output to and combined with the GPS U files being recorded on the Ashtech MicroZ.
The WXT520 met-pack is now configured to output messages that look like:
$WIXDR,A,282,D,1,S,0.1,M,1,C,22.0,C,0,H,23.0,P,0,P,0.8211,B,0,V,0.00,M,0,V,0.0,M,1*42
This message will be read by the Ashtech MicroZ and injected into U files being recorded on the GPS receiver.
In order to check that these messages are being output at the specified rate, connect to the WXT520 via Hyperterminal. Below are the settings you need to set in the Hyperterminal. From within Hyperterminal, click the drop-down menu File and select “Properties”.
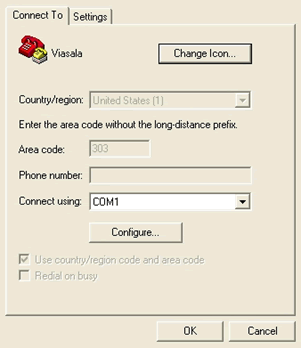
Figure 6: Beginning menu to configure Hyperterminal to communicate with the WXT520.
From here click on the “Settings” tab at the top. The following window will apper. Check that the settings are as they are shown here:
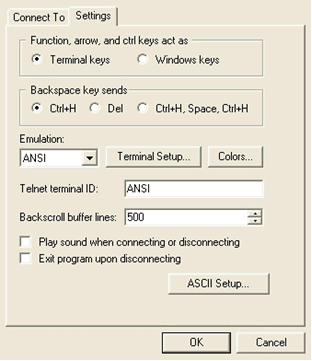
Figure 7: Set these values on your hyperterminal.
From this window click on “ASCII Setup…” to get the following menu. Check that the settings are as they are shown here:
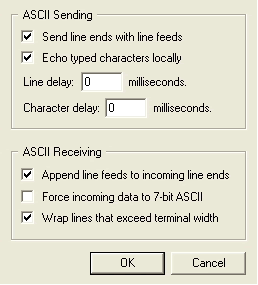
Figure 8: These settings will allow you to send commands to the WXT520 via hyperterminal.
Now that all of this is set, click OK until you get back to the main Hyperterminal menu. You are now ready to connect to the WXT520. Once you connect you will start seeing the Composite Message come through to the terminal.
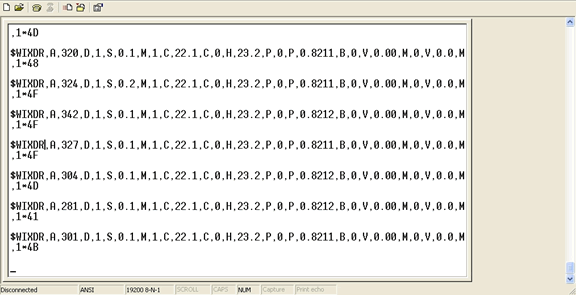
Figure 9: Composite message coming through Hyperterminal.
Now we set up the Ashtech MicroZ GPS receiver to collect met-pack data from the WXT520. Connect to the Ashtech MicroZ using sharc in terminal mode. From the command line issue the following command:
> sharc --port /dev/ttyS0 --baud 19200 --terminal
Creation Time: Tue Oct 27 21:48:09 2009
Sharc version 1.00b3
------------------
Planned Operations
------------------
Communications: Direct Connect
Port: /dev/ttyS0
Baud: 19200
Parity: N
Data Bits: 8
Stop Bits: 1
-----------------
Actual Operations
-----------------
Communications: OK
OpenConnection:Direct connection achieved...
Querying Receiver ID (attempt 0):
Receiver ID: $PASHR,RID,UZ,30,CQ00,---XM--3------C,1A01*20
Found: UZ,30,CQ00,---XM--3------C,1A01*20
Terminal->
At this point issue the commands:
Terminal-> $pashs,out,c,met,on
Terminal-> $pashs,met,cmd,c,*
Terminal-> $pashs,met,init,c,no
Terminal-> $pashs,met,intvl,c,[interval you want]
Now you check that the receiver is ready to start receiving met-data from the WXT520 by issuing the following command:
Terminal-> $pashq,met
Input = $PASHQ,MET
                   MET METER PARAMETERS SETTINGS
PRTA:OFF INIT_STR:NO             TRIG_CMD:*0100P9        INTVL:00005
PRTB:OFF INIT_STR:NO             TRIG_CMD:*0100P9        INTVL:00005
PRTC:ON  INIT_STR:NO             TRIG_CMD:NO             INTVL:00005
PRTD:OFF INIT_STR:NO             TRIG_CMD:*0100P9        INTVL:00005
Now connect the serial cable of the WXT520 to the Y cable of the Ashtech MicroZ and you should start seeing the input single slight turn green at the interval you specified the composite message should be output by the WXT520.
In order to double check that data is being injected into the U files being recorded set the receiver to log some data and then download the U file and run teqc on it as follows:
teqc +ash u +met $Ufile.met $Ufile.doy > $Ufile.09o
This command will produce a file with extension “met” where the met data is contained. Here is a sample of what the met data file should look like:
     2.11           METEOROLOGICAL DATA                     RINEX VERSION / TYPE
teqc  2009Mar23                         20091027 20:07:30UTCPGM / RUN BY / DATE
Linux 2.4.20-8|Pentium IV|gcc -static|Linux|486/DX+         COMMENT
                                                            MARKER NAME
????                                                        MARKER NUMBER
     7    PR    TD    HR    WS    WD    RI    HI            # / TYPES OF OBSERV
                                                  0.0    PR SENSOR MOD/TYPE/ACC
                                                  0.0    TD SENSOR MOD/TYPE/ACC
                                                  0.0    HR SENSOR MOD/TYPE/ACC
                                                  0.0    WS SENSOR MOD/TYPE/ACC
                                                  0.0    WD SENSOR MOD/TYPE/ACC
                                                  0.0    RI SENSOR MOD/TYPE/ACC
                                                  0.0    HI SENSOR MOD/TYPE/ACC
        0.0000        0.0000        0.0000        0.0000 PR SENSOR POS XYZ/H
                                                            END OF HEADER
 09 10 27 20  6  4  821.4   22.2   22.8    0.1  279.0    0.0    0.0
 09 10 27 20  6 19  821.4   22.2   22.8    0.2  358.0    0.0    0.0
 09 10 27 20  6 34  821.4   22.2   22.8    0.1  325.0    0.0    0.0
 09 10 27 20  6 49  821.4   22.2   22.9    0.1  295.0    0.0    0.0
 09 10 27 20  7  4  821.4   22.3   22.9    0.1  329.0    0.0    0.0
nf2009
Article ID: 528
Created: January 26, 2010
Last Updated: January 26, 2010
Author: Beth Bartel
Online URL: https://kb.unavco.org/article/vaisala-how-to-integrate-the-vaisala-wxt520-with-the-ashtech-microz-528.html