Paroscientific - How to integrate the Paroscientific MET3 with the Topcon NET-G3
Integrating the MET3 with the Topcon NET-G3
Equipment needed
MET3
MET3 cable
RS232+9V mixer
NET-G3 receiver
Software Needed
Configuring the MET3
Connect the MET3 to a serial port on your desktop computer using the RS232+9V mixer (otherwise the MET3 won’t have power to respond to the commands you send it). If you need to change baud rates send it commands in the following format:
*9900BR=[desired baud rate]
The MET3 will respond with *9900BR=[baud rate you set it to]. You will then have to reconnect to the MET3. Once you have reconnected you can send it the following command to make sure it is outputting NMEA XDR messages:
*0100P9
You should see a reply from the MET3 that looks like:
$WIXDR,P,.842928,B,DQ 79591,C,22.40,C,DQRHT250,H,27.6,P,DQRHT250
This will let you know that the MET3 is configured and ready to be integrated with the Topcon NET-G3 GPS receiver. Now disconnect the MET3 from the back of your computer and connect it, along with the RS232+9V adapter to a serial port on the back of the NET-G3. In this document we have chosen to use serial port C on the NET-G3.
Configuring the NET-G3
Connect the DB9-Fisher RS232 cable that comes with the Topcon receiver to the back a serial port on the back of your desktop computer and to the front of the NET-G3. Now Start PC-CDU and connect to the receiver. Once you are connected from the Configuration dropdown menu select Receiver. After the configuration window shows up select the Ports tab at the top and set the serial port as you see here:
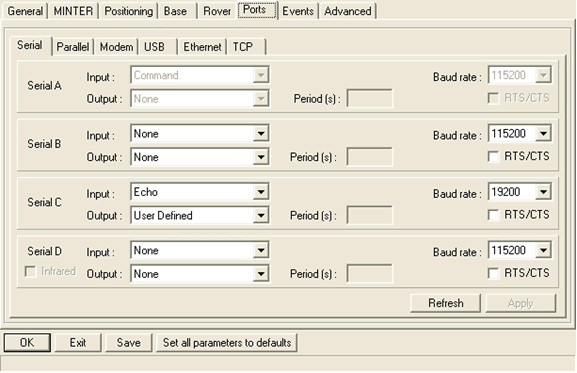
Figure 1: Since we connected the MET3 to serial port C on the back of the receiver we have set that serial port to communicate with the MET3 at the same baud rate we set the MET3 to be. We have also selected the Input to be Echo and the output to be User Defined. Make sure you DO NOT select RTS/CTS.
After you have configured the serial port on the NET-G3 click OK and this will take you back to the original window you started at.
We now need so some GRIL commands to the NET-G3 to set a few more things on the serial port. From the File dropdown menu select Manual Mode, this will open up a terminal where you can issue GRIL commands to the receiver. We need to enable the wrapped echo mode, using the following command:
set, dev/ser/c/ewrap, on
Now we set the NET-G3 to query the MET3 at a specified interval of time to do that we send the following command:
em, dev/ser/c, misc/MET3: 5
The command above will query the receiver every 5 seconds for a NMEA XDR message.
Now we can test whether or not the MET3 and the NET-G3 are communicating. To do this send the following command:
set, dev/ser/c/echo, /cur/term
The command above will start outputting messages every few seconds to the terminal in the following form:
00Cc$WIXDR,P,97
019c1.006223,B,DQ 92366,C,D1
016c26.21,C,DQRHT519,H,29
014c17.6,P,DQRHT519
01
Now you know that the two devices are communicating. At this point you are ready to redirect these messages to the GPS file currently being logged. To do this issue the following command:
set, dev/ser/c/echo, /cur/file/a
The MET3 data is now being recorded in the currently logged GPS file every 5 seconds. You can download the file currently being logged and run the following command to extract the met data:
teqc -top tps +met $filename.met $filename > $filename.09o
You should see something like the following in the $filename.met file:
     2.11           METEOROLOGICAL DATA                     RINEX VERSION / TYPE
teqc  2008Oct2      nic                 20091103 19:29:10UTCPGM / RUN BY / DATE
Linux 2.4.20-8|Pentium IV|gcc|Linux|486/DX+                 COMMENT
                                                            MARKER NAME
     7    PR    TD    HR    WS    WD    RI    HI            # / TYPES OF OBSERV
                                                  0.0    PR SENSOR MOD/TYPE/ACC
                                                  0.0    TD SENSOR MOD/TYPE/ACC
                                                  0.0    HR SENSOR MOD/TYPE/ACC
                                                  0.0    WS SENSOR MOD/TYPE/ACC
                                                  0.0    WD SENSOR MOD/TYPE/ACC
                                                  0.0    RI SENSOR MOD/TYPE/ACC
                                                  0.0    HI SENSOR MOD/TYPE/ACC
        0.0000        0.0000        0.0000        0.0000 PR SENSOR POS XYZ/H
                                                            END OF HEADER
 09 11  3 19 27 36  842.8   22.4   27.7    0.0    0.0    0.0    0.0
 09 11  3 19 27 41  842.8   22.4   27.7    0.0    0.0    0.0    0.0
 09 11  3 19 27 46  842.8   22.4   27.7    0.0    0.0    0.0    0.0
 09 11  3 19 27 51  842.8   22.4   27.7    0.0    0.0    0.0    0.0
 09 11  3 19 27 56  842.8   22.4   27.7    0.0    0.0    0.0    0.0
 09 11  3 19 28  1  842.8   22.4   27.7    0.0    0.0    0.0    0.0
 09 11  3 19 28  6  842.8   22.4   27.7    0.0    0.0    0.0    0.0
 09 11  3 19 28 11  842.8   22.4   27.7    0.0    0.0    0.0    0.0
 09 11  3 19 28 16  842.8   22.4   27.7    0.0    0.0    0.0    0.0
 09 11  3 19 28 21  842.8   22.4   27.7    0.0    0.0    0.0    0.0
 09 11  3 19 28 26  842.8   22.4   27.7    0.0    0.0    0.0    0.0
nf2009
Article ID: 527
Created: January 26, 2010
Last Updated: January 26, 2010
Author: Beth Bartel
Online URL: https://kb.unavco.org/article/paroscientific-how-to-integrate-the-paroscientific-met3-with-the-topcon-net-g3-527.html