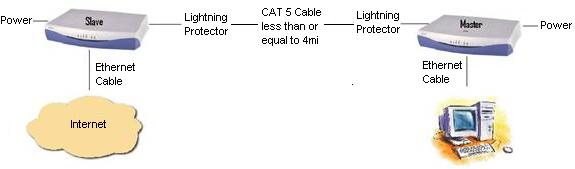
Figure 1: Working configuration of a STA-AP RAM modem pair.
RAD modems can be used to extend an Ethernet connection over a 4-wire copper cable for a distance of up to 4 miles.
Figure 1: Working configuration of a STA-AP RAM modem pair.
The two modems have a AP-STA relationship. New modems out of the box have no AP or STA setting; for our uses we have assigned the modem closest to the computer to be the AP modem and the one closest to the internet hub the STA modem. To get the modems to work requires the following:
Set up the modems as shown in Figure 2 (below).
Configure one modem to be AP.
Configure the other modem to be STA.
Note: Before shipping:
Reset user name and password to match the computer (the symbols & or @ are not allowed).
Clear log tables.
To configure the AP modem, set up the modem as shown in Figure 2 (below).
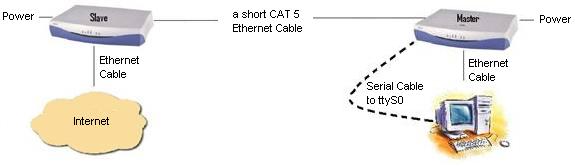
Figure 2: Set-up for configuration of the AP modem.
Connect the serial cable from the serial port on the back of the modem to port ttyS* on the back of the computer (where * represents the serial port number). Now open a terminal window and type:
[root@hostname]# ~]# cu -l /dev/ttyS0
(Note that in order for this command to be executed you must have cu installed. In Fedora, the rpm that provides cu is uucp.) The above command will take you into the configuration menu of the RAD modem.
|
To access the modem you will need to enter a USER NAME and a PASSWORD. All modems out of the box have the following USER NAME and PASSWORD scheme:
WARNING! Never use the symbols & and @ when assigning user names and password to these modems.
USER NAME = < none just hit enter here >
PASSWORD = 1234
After you log in you will be in the Main Menu:
|
Navigating through the menu is quite simple. To move forward within each menu option, enter the numbers that correspond to the menu options you see. To move backwards through the menu options, use the Esc key.
First, set the AP Clock setting. This setting governs whether the modem is a AP modem or a STA modem. In the AP Clock menu you have two choices: "Receive" and "Internal."
Giving a modem a AP Clock setting of "Internal" will make it a AP modem.
Giving a modem a AP Clock setting of "Receiver" will make it a STA modem.
To get to the AP Clock menu from the Main Menu, go into Configuration:
|
Choose System Configuration from within the Configuration menu.
|
Choose AP Clock from within the System configuration menu.
|
To make this modem the AP, type 2 at the command prompt and then hit Enter. This will take you back into the System Configuration menu. To save the new setting, type 7 and hit Enter. Our modem is now a AP modem. To get back to the main menu, hit the Esc key. You may have to do so several times.
Use the same sequence of menu options to set the second modem to be the STA modem. The only two differences are:
Switch the serial cable from the back of the AP modem to the modem that will be the STA modem. See Figure 3.
In the AP Clock options, choose "Receive" instead of "Internal," and then Save.

Figure 3: Set-up for configuration of the STA modem.
After saving the "Receive" setting for the AP Clock setting on the STA modem, the two modems will go through a sequence of light blinking. Once they are done each modem will have three green lights in the front, which means the two modems are now working properly.
User name and password can be set from the Terminal menu.
From the Main Menu, select Configure > System Configuration > Control Port > Port Control > Terminal.
|
Select Change Access.
|
To enter a new user name, type 1 and hit the Enter key. To enter a new password, type 2 and hit the Enter key. You must save any changes you make. Go back to the Terminal menu by hitting the Escape key, and save the new user name and password.
Before shipping, it is a good idea to clear all log files in each of the modems. To do this, start from the Main Menu page and follow this sequence of menu options: Monitoring (3) > System Monitoring (2).
You should now be in the System Monitoring menu:
|
Type 3 and then hit the Enter key to clear log files; type "Y" to confirm the clearing of the log files.
When the remote site has free IP address we can assign one to the AP modem and have access to it via a web browser. The IP address is given to the modem in the Management menu. To get to the Management menu, start from the Main menu and choose the following sequence of menu options: Configure (2) > System Configuration > Management (3).
|
In the Management menu we need to configure two options:
Host IP
Manager List
To configure the Host IP, type 2 and hit the Enter key. You will now find yourself in the following window:
|
Here you will need to enter a Host IP address, a Host IP mask and a Host default gateway. To enter the Host IP address, type 1 and hit the Enter key; you can now type in an IP address that is assigned to this modem. When you are done, hit the Enter key; this will put your cursor to the right of the ">". Now do the same for Host IP mask and Host default gateway. When you are done, hit the Esc key and Save.
To configure the Manager list, type 3 and hit the Enter key. The IP addresses on this list are the only ones that are allowed to log into the modem and make changes. We can specify up to 10 IP addresses. Each IP address has a corresponding network mask that must also be specified. You can enter these addresses in the same way we entered the Host IP addresses above.
|
Again, when you are done, hit the Esc key and Save. Now you are able to configure the modem via the internet by entering the following address into a web browser:
http:// < ip number assigned to the AP modem >
Set up the modems in between any internet connection to check that they work properly before shipping out to a site.
Article ID: 262
Created: May 11, 2009
Last Updated: June 12, 2020
Author: Beth Bartel
Online URL: https://kb.unavco.org/article/how-to-configure-a-rad-modem-pair-262.html