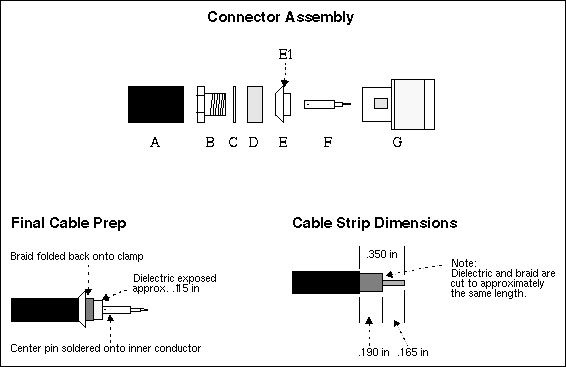
How to assemble a Times N-Type Connector (historical)
How to assemble a Times N-Type Connector
07 NOV 95 - Note: UNAVCO currently uses a crimp style N-type
connector rather than the type below. (Dec 2008)
Cut the cable to the desired length.
Slide heat shrink (A), nut (B), washer (C), and rubber gasket (D) onto cable end in that order.
Remove the cable sheathing (be careful not to damage the wire braid under it) with a cut [.350 in] from the end of the cable. See Cable Strip Dimensions below.
Slide clamp (E) over braid and then brush braid back over clamp. Cut braid so that it extends up to the clamps edge (E1) when folded back. Leave the foil wrap that sheaths the dielectric intact.
Cut dielectric (the white or clear opaque shielding of the center conductor) [.165 in] from the cable end, to expose the inner conductor. Be careful not to damage the inner conductor wire.
Solder the pin (F) onto the inner conductor. Be careful to not get excess solder on the pin. This completes the cable preparation. See the Final Cable Prep diagram below.
Put on the connector body (G) and tighten with nut (B). The pin (F) should be slightly recessed from the front face of the connector body (G).
Melt the heat-shrink over the nut and some of the cable.

)